Thursday 30 December 2021

So Stinkin' Cute

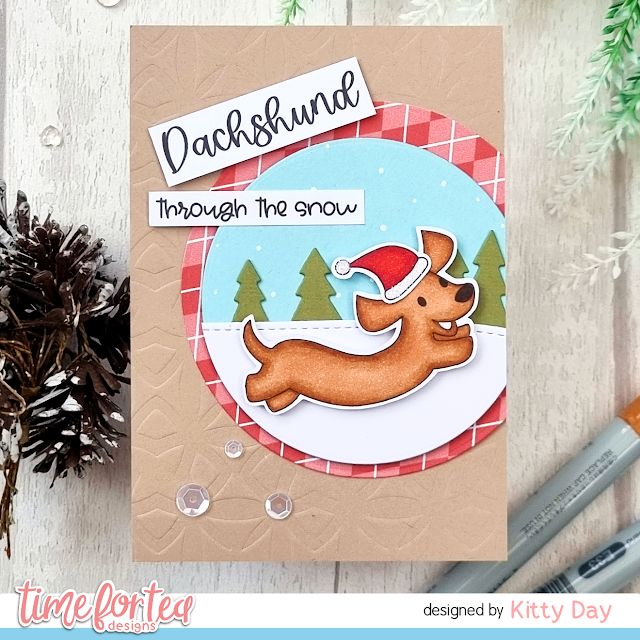
Hello crafty friends. I hope you had a fabulous Christmas! I will be back in the swing of things next week as at the moment I'm spending some much needed time with my lovely family. It is Thursday though which means my usual DT card for Time For Tea Designs. This time I've created a simple scene with some cute skunks...

I started out by creating a gently blended background using my Mermaid Lagoon & Salvaged Patina Distress Oxide Inks. I then added some splats of water with a paint brush. I mounted the panel onto a white card with foam. All the images are from the Stinkin' Cute Stamp Set which I stamped and coloured with my Copics. I added some white dots on the mushroom with a white pen. I used the coordinating Stinkin' Cute Dies to cut them out. I heat embossed the sentiments in white onto black card and die cut them with the dies. I arranged all the images onto my panel and attached them in place with glue and foam pads.


Supplies;
Time For Tea Designs Stamps -Stinkin' Cute
Time For Tea Designs Dies - Stinkin' Cute
Distress Oxide Inks - Mermaid Lagoon, Salvaged Patina
Copic Markers
Posca Pen


Don't forget you can get yourself 10% off anything at Time For Tea Designs using my code T4TKITTY10

Thank you ever so much for stopping by today. I will be back to posting more regulary now I am covid free and once normal routine is back next week! Take care and stay safe.

Kitty xx

Wednesday 22 December 2021

Oh So Merry!

Good morning fello crafters! I'm currently in self isolation as both myself and my daughter have covid. I haven't felt up to creating any cards sadly but I had this one I hadn't blogged yet so I thought I would share it with you guys...

Just a simple Christmas one! This one features Reverse Confetti Polar Party Stamps. I coloured each of them with Copics and cut them out. I created a splash effect background using some Mermaid Lagoon Distress Oxide Ink with some water on watercolour card. I added some splats with glimmer mist for added sparkle. I added some glitter and gloss to parts of the coloured images too. The sentiment is from Mama Elephant Everything Nice Stamp Set. I cut them out with the coordinating dies. To finish I added some clear gems.


Supplies;
Reverse Confetti Stamps - Polar Party
Mama Elephant Stamps & Dies - Everything Nice
Distress Oxide Inks - Mermaid Lagoon
Copic Pens
Clear Gems


I really hope you all have a fabulous Christmas. Stay safe and well and I will be back soon as I can with more creations.

Kitty xx

Thursday 16 December 2021

Dachshund Through The Snow

Hello fellow crafters. I am still trying to squeeze in a few more Christmas cards. I've actually run out of ready ones so I need to create a few more! It's time for my usual Thursday post for Time For Tea Designs. This time I used one of the new releases featuring some super cute Dachshunds...

I started off by creating the background. I used the Boho Tiles Stencil to create a lightly embossed background onto kraft card. I used one of the papers from the Joyful Winter Paper Pad and die cut it with one of the circle dies from the Simple Circles Dies. I created a mini circle scene using the circle dies again along with some of the trees from the Slimline Mini Village Dies. I used one of the stitched dies from the Landscape Edge Dies. I added some snow to the sky using a white pen. I then used the Stop Dachshund Around Stamp Set for the cute dog. I coloured him with copics and popped him onto foam pads. I added the sentiments from the same stamp set and finished by adding some sequins.


Supplies;
Time For Tea Designs Stamps - Stop Dachshund Around
Time For Tea Designs Dies - Simple Circles, Landscape Edge Dies, Slimline Mini Village
Time For Tea Designs Stencils - Boho Tiles
Time For Tea Designs Paper Pad - Joyful Winter
Copic Pens
Kraft Card
Sequins


That's all from me today. Don't forget to use the code T4TKITTY10 for 10% your next order at Time For Tea Designs. I will be back as soon as I can with more cards.

Kitty xx

Tuesday 14 December 2021

Miss You

Good morning! Sorry I haven't been around much lately. I often go a bit quiet in December but I will post as and when I can. Can't believe it's only two weeks until Christmas it's flown by! Today I am sharing one of my cards that was made for my Full Shaker Panel project...

This one was featured in Crafts Beautiful along with another two cards. I had so much fun creating these! I created the background first. I used the Taylored Expressions Butterflies Stamp & Stencil Combo. I used various Distress Oxide Inks (Kitsch Flamingo, Dried Marigold, Squeezed Lemonade, Twisted Citron and Salvaged Patina) to create a rainbow effect background. I scored and wrapped some acetate around the background and filled it with gems, sequins and pearls before sealing it shut. I mounted it onto blue card and onto a card blank. I used my favourite sentiment stamps the Concord & 9th Big On You Stamps & Die Set to add the sentiments.


Supplies;
Taylored Expressions Stamp & Stencil Combo - Butterflies
Concord & 9th Stamps - Big On You
Concord & 9th Dies - Big On You
Distress Oxide Inks - Kitsch Flamingo, Dried Marigold, Squeezed Lemonade, Twisted Citron, Salvaged Patina
Sequins, Gems & Pearls


Thank you ever so much for stopping by today. I will be back on Thursday with my latest Time For Tea card.

Kitty xx

Thursday 9 December 2021

Mouse Hugs

Hello crafty friends. So sorry I haven't posted for a while but I hope to be able to share more things with you soon - it's always a bit manic close to Christmas! I do today have something to share with you. This one was created for Time For Tea Designs using some of the latest releases...

I started out by creating my background. I blended Picked Raspberry, Spiced Marmalade, Wild Honey Squeezed Lemonade and Mustard Seed. I blended a small strip of just the yellows and added it to the bottom. I splattered the panel with some water and also grey ink. The images are all from the Baked With More Love Stamp Set. I coloured all of them with my Copics and fussy cut them out. I die cut the hugs word from black and white using the Hugs Stitched Sentiment Die. I used the Black Polka Dot Washi Tape to create a fishtail shape mini banner. I added some clear gems onto the card to finish.


Supplies;
Time For Tea Designs Stamps - Baked With More Love
Time For Tea Designs Dies - Hugs Stitched Sentiment
Time For Tea Designs Washi - Black Polka Dot
Distress Oxide Inks - Picked Raspberry, Spiced Marmalade, Wild Honey, Mustard Seed, Squeezed Lemonade
Copic Markers
Clear Gems


Don't forget you can use the code T4TKITTY10 to get 10% off your next order at Time For Tea Designs.

Thank you for stopping by today, I will be back with another creation when I can - watch this space as they say!

Kitty xx

Thursday 2 December 2021

Jumping With Joy

Hello crafty friends. Today I am back to share my latest card for Time For Tea Designs. This one features a sweet autuminal scene featuring some of the brand new release products...

I started off by creating the background. I blended Dried Marigold and Fossilized Amber Distress Oxide Inks together onto a piece of white slimline card. I then blended some Bundled Sage Distress Oxide onto a strip of card and die cut it using the Grass Die from the Slimline Hillside Scene Dies. I used the new Winter Trees Die and cut out four trees from kraft card then added them to each end. I used the Jumping With Joy & Stinkin' Cute Stamp Sets so I could add extra characters from each set. I coloured them all with Copics and cut them out with the Coordinating Dies. I stamped and die cut the sentiment too then added all my pieces onto the card with foam pads.


Supplies;
Time For Tea Designs Stamp - Jumping For You, Stinkin' Cute
Time For Tea Designs Dies - Jumping For You, Stinkin' Cute, Winter Trees, Slimline Hillside Scenes
Distress Oxide Inks - Dried Marigold, Fossilized Amber, Bundled Sage
Copic Pens


Don't forget you can use my discount code T4TKITTY10 to get yourself 10% off your order at Time For Tea Designs.

Thank you for stopping by today, I will be back soon with more creations. Stay warm.

Kitty xx

Wednesday 1 December 2021

Not Another Birthday

Good morning! Today is the day, it's release day over at Clearly Besotted Stamps. The new release will be available tonight at 8pm GMT. I have my final card to share with you which features another new stamp set...

The stamps I used are from the Clearly Besotted Birthday Boycott Stamp Set. I think it's hilarious, there are so many funny sentiments in this set perfect for those who hate birthdays! I created a simple blended background onto a slim card blank using Salvaged Patina Distress Ink. I then added a handrawn border around the piece. I added a strip of washi tape then stamped the sentiment directly onto the card. I added the images with foam pads and added some clear gems to finish.


Supplies;
Clearly Besotted Stamps - Birthday Boycott
Distress Oxide Inks - Salvaged Patina
Copic Markers
Washi Tape
Clear Gems


Thank you ever so much for checking out my card today and all your comments on my media pages. Do check out the main Clearly Besotted Blog for the full reveal and more ideas. Don't forget you the release is tonight at 8pm GMT at Clearly Besotted. I just want to thank all the team for letting me join in as a Guest Designer once again - always such a pleasure to work with such amazing stamps.

Kitty xx

Tuesday 30 November 2021

Pigs In Blankets

It's time for Day 4 of the Clearly Besotted Previews! Only one more day to go until you can get your hands on the fabulous new release! Have you any favourites so far? Today's card features such a cute funny 'must have' stamp set...


This card features the fablous new Pigs Ink Blankets Stamp Set. How cute is that!!! I love how fun and different this stamp set is - and perfect for non Christmas too, especially get well soon cards. I created a sweet scene for this one. I masked off the bottom panel and blended some Tea Dye & Pumice Stone Distress Oxide Inks. I then created the blended bit above using Mustard Seed, Fossilzed Amber and Spiced Marmalade. I stamped and coloured all my images with Copics and cut them out. I added some glitter onto the stars and added all the images with foam pads. To finish I added a stamped sentiment.


Supplies;
Clearly Besotted Stamps - Pigs In Blankets
Distress Oxide Inks - Pumice Stone, Tea Dye, Mustard Seed, Fossilized Amber, Spiced Marmalade
Copic Markers
Nuvo Glitter Pen
Coloured Card


Thank you ever so much for joining me again today. I will be back tomorrow with my final card before the new release goes live!

Kitty xx

Monday 29 November 2021

Christmouse

Good Morning crafty friends. Today is Day 3 of the previews at Clearly Besotted. The new release is only a few days away and I hope you are enjoying the sneak peeks so far. Here is today's card...

For this card I used the new Clearly Besotted Squeak It's Christmas Stamp Set. There are so many beautiful sentiments in this set it's hard to use what to use! I coloured all he images with Copic Pens then cut them out. To create the background I used my MFT Sun Ray Stencil along with some Tumbled Glass, Blueprint Sketch & Stormy Skies Distress Oxide Inks. I used my Lawn Fawn Slimline Simple Hillside Borders Die to create the snowhill with some white card. I stamped a sentiment directly onto it. I then added a stamped and layered sentiment to finish.


Supplies;
Clearly Besotted Stamps - Squeak It's Christmas
Lawn Fawn Dies - Slimline Simple Hillside Borders
My Favorite Things Stencils - Sun Ray
Distress Oxide Inks - Tumbled Glass, Stormy Skies, Blueprint Sketch
Copic Pens


Do make sure you head over to the Clearly Besotted Stamps Blog to find more inspiration and previews. I will be back tomorrow with another card. Have a nice day!

Kitty xx

Sunday 28 November 2021

Get Crabby

Hello my lovelies! It's time for Day 2 of the teasers at Clearly Besotted. I've got my latest GDT card to share with you. This time I created a fun under water scene...

For this card I used the new Clearly Besotted Santa Claws Stamp Set. I coloured all the images with Copics and fussy cut them out. I created the background using my MFT Sun Ray Stencil along with Salvaged Patina and Peacock Feathers Distress Ink. I blended a little Antique Linen Ink onto card and die cut it with my Lawn Fawn Stitched Border Die to create a little sand hill. I stamped out the sentiment from the same stamp set. I arranged all the images on the background then fixed them with the sentiment onto the card with foam pads. To finish I added a few Clear Dew Drops.


Supplies;
Clearly Besotted Stamps - Santa Paws
Lawn Fawn Dies - Slimline Stitched Hillside
My Favorite Things Stencils - Sun Ray
Distress Oxide Inks - Salvaged Patina, Peacock Feathers
Copic Markers
Clear Dew Drops


Don't forget to head over to the Clearly Besotted Blog to check out more previews and samples along with links to all the DT creations.

Thank you for visiting today and I'll see you tomorrow with Day 3!

Kitty xx

Saturday 27 November 2021

Clearly Besotted Teasers Day 1 - Winter Corners

Good morning crafty friends! It's the start of the brand new previews for the December launch at Clearly Besotted Stamps. The launch will be on 1st December and we have 5 whole days of previews from the whole team. I am delighted once again so be joining in this month as a guest designer...

How cute are those little penguins!? I just love them! These cuties are from the Winter Corners Stamp Set. I kept the design simple for this one and created a lightly blended background using Salvaged Patina Distress Oxide Ink. I then stamped my images and coloured them with Copics. I added them onto the card with foam pads. I added a stamped sentiment from the same stamp set and added some clear gems to finish.


Supplies;
Clearly Besotted Stamps - Winter Corners
Distress Oxide Inks - Salvaged Patina
Copic Pens
Clear Gems


Thank you ever so much for joining me and I will be back tomorrow with day two of the previews.

Kitty xx

Friday 26 November 2021

Merry Christmas Slimline

Good morning my lovely crafters! Today I am over on the SugarPea Designs Blog with my latest card. This time I decided to create a Christmas slimline card but using non traditional Christmas colours...

I started off by creating my blended background using Seedless Preserves, Kitsch Flamingo & Dried Marigold Distress Oxide Inks. I then splattered the background with shimmer spray and white ink. Once dry I added white snow hill to the bottom of the panel. I used the Merry Christmas from the SugarPea Designs Oh So Jolly Sentiments Stamp Set and stamped it directly onto the panel. I used the SugarPea Designs Hey Winter Stamp Set for all my images. I stamped them, coloured them with Copics and cut them out. I arranged all the images on the card and fixed them in place with foam pads. To finish I added a few pearls to the sky.


Supplies;
SugarPea Designs Stamps - Hey Winter, Oh So Jolly Sentiments
Distress Oxide Inks - Seedless Preserves, Kitsch Flamingo, Dried Marigold
Copic Markers
Pearls


Thank you ever so much for stopping by today. I will be back with more creations next week. Have a lovely weekend.

Kitty xx

Thursday 25 November 2021

Coffee First

Hello crafty friends! Are you feeling Christmassy yet? We have just put up all our decs so I'm feeling a bit more festive. Today I am sharing my latest card for Time For Tea Designs. This time I went for a fun coffee themed card...

I started off by blending a little Gathered Twigs Distress Ink onto a white panel. I added some hand-drawn borders to create a frame. I then splattered some ink with water onto the panel. I stamped & coloured the coffee cups from the Coffee Lover Stamp Set. I coloured them with Copics then cut them out using the Coffee Lover Die Set. I added them onto the panel with foam pads and added some twine to the bottom of the panel. I mounted it onto brown card then onto a card base. I added a stamped and die cut sentiment then added some Clear Drops to finish.


Supplies;
Time For Tea Designs Stamps - Coffee Lover
Time For Tea Designs Dies - Coffee Lover
Distress Oxide Inks - Gathered Twigs
Copic Pens
Twine
Clear Drops


Thank you for stopping by today. I will be back with more creations very soon.
You can get 10% off at Time For Tea Designs using the code T4TKITTY10

Kitty xx

Wednesday 24 November 2021

Doodlebug Shadow Boxes

Hi crafty peeps! Today I thought I would share some sweet boxes that I made using Doodlebug Designs Collections that were featured in Crafts Beautiful. These are actually little shadow boxes that you can use as Christmas tree decorations or just little hanging decs. I love how cute all Doodlebug products are...

For these boxes I created a box template to create the boxes that measured 8cm square. I then die cut a window in the front of each box using Time For Tea Designs Square Label Dies, Circle Dies and MFT Square Dies. I used Doodlebug Santa Claus Is Coming To Town Petite Prints Papers and coordinating card to create the box, outer and inner panels. I punched a hole in the top and added a ribbon handle. I added glitter card inside each panel to create a snow effect. I decorated the inside and outside of the boxes with Doodlebug Icon Stickers & Mini Stickers.


Supplies;
Doodlebug Santa Claus Is Coming Town Collection - Icon Stickers, Mini Stickers, Petite Prints Papers
Time For Tea Designs Dies - Circles, Square Labels
MFT Die-namics Dies - Square STAX
Coloured Card


Thank you ever so much for stopping by today. I will be back tomorrow with my latest card for Time For Tea Designs.

Kitty xx

Thursday 18 November 2021

Sending Virtual Hugs

Hi crafty friends! I have my latest card for Time For Tea Designs to share with you today. I went for something colourful. It is actually a bit brighter in real life but I struggled to get a good photo this morning. I used my fav stamp set...crocs!

For this card I used the Time For Tea Designs Snappy Before Coffee Stamp Set. I stamped all the images, coloured them in with Copics and cut them out with the Snappy Before Coffee Co-ordinating Dies. I created a blended background using my Distress Oxide Inks. The colours I used are; Peacock Feathers, Cracked Pistachio, Antique Linen and Spun Sugar. I created a die cut fence using the die from the Windmill Add On Die Set. I die cut the word smile from black and white card using the smile die from the Smile Inverted Scallop Frames Dies. I added a strip of Stripes Washi Tape at the bottom then added a slither of black card to make it look mounted. I added a couple of die cut sentiments from the Brighter Days Sentiment Cards. To finish I added a few Clear Drops.


Supplies;
Time For Tea Designs Stamps - Snappy Before Coffee
Time For Tea Designs Dies - Snappy Before Coffee, Windmill Add On, Smile Inverted Scallop Frames
Time For Tea Designs Washi Tape - Stripes
Time For Tea Designs Printed Sentiments - Brighter Days
Distress Oxide Inks - Peacock Feathers, Cracked Pistachio, Antique Linen, Worn Lipstick
Copic Markers
Clear Drops


Don't forget you can use my discount code T4TKITTY10 to get yourself 10% off your order at Time For Tea Designs.

I will be back soon with more creations.

Kitty xx

Wednesday 17 November 2021

Make A Splash

Good morning crafy friends. Today it's my turn to share my card for the latest SugarPea Designs Mix It Up Challenge 85. We have both a sketch and colour combo to follow - you can use either or both! Head over to the blog for full details and to enter. Here is my card for the challenge...

I started off lightly blending Faded Jeans Distress Oxide Ink through the SPD Wave Stencil. I then stamped my mermaid, seahorse and shells from the SPD Mermaid Kisses Stamp Set. I cut them out and coloured them with Copics. I created a rock from card and added some shading with Copics. I attached all my images onto the card with foam pads. I stamped and layered the sentiment and fixed it onto the card. To finished I added some Clear Rain Drops.


Supplies;
SugarPea Designs Stamps - Mermaid Kisses
SugarPea Designs Stencils - Wave
Distress Oxide Ink - Faded Jeans
Copic Markers
Rain Drops

Thank you ever so  much for stopping by today and don't forget to add your entry into the SugarPea Designs Challenge.

Kitty xx

Thursday 11 November 2021

My Summer Memory Book

Hello & welcome to my usual Thursday post for Time For Tea Designs. Today I am sharing my summer memory book that I made using lots of the new products from the Memory Keeping Collection. I was going to share just a page of my book, but I thought I would just share the whole thing so there are quite a few pictures! I had so much fun creating this one...

I used a book chipboard book as my base layer for my book and creating each page directly onto each piece. I used papers from both the Sweet Summer Paper Pad and Brighter Days Paper Pad. I used quite a big mix of the embellishments! I used the Sweet Summer Journaling Cards, Sweet Summer Die Cut Ephemera, Enamel Dots, Washi Tapes, Noted Tab & Mood Stickers, Label & Banner Stickers. I used the new Tall Alpha Stamp Set to spell out the word 'Family'. I used the 'Memories' word & 'Location Symbol' from the Creating Memories Stamp Set. I used the Memory Keeping Essential Dies to create the 'Lol' word & heart shapes. You can view all the products from the latest collection here.


I do hope you have enjoyed viewing my book. Don't forget you can get 10% off your next order using the code T4TKITTY10.

Kitty xx

Tuesday 9 November 2021

You Bake Me Happy

Good morning! Today I am sharing a cute fun 3D Box card that was featured in PaperCrafter Magazine...


For this card I used the Doodlebug Made With Love Collection. I used the 6x6 Paper Pad, Die Cuts & Stickers. I created the base shape of my Shadow Box Card using some mint card then die cut a rectangle window from the middle panel. I added background paper behind the frame and also to the two side panels. I then decorated the card using various Die Cuts & Stickers.


Supplies;
Doodlebug 6x6 Paper Pad - Made With Love
Doodlebug Die Cut Ephemera - Made With Love
Doodlebug Icons Cardstock Stickers - Made With Love
Coloured Card


Thank you so much for stopping by today. I will be back soon with more creations.

Kitty xx

Thursday 4 November 2021

Sunday Fun

Hello crafty friends and welcome to my usual weekly post for Time For Tea Designs. Last week the new memory keeping release went live so I thought I would share my latest make using some of the new items. It was such a refreshing change to create some memory book/journaling pages and books and I can't wait to share more with you. Here is my first page...


I started out by creating my background. I used lots of different cardstockk to create a bright backing along with a touch of patterned paper. The yellow & blue panels are from the Sweet Summer Paper Pad which were mounted onto white card. I mounted all three photos onto glitter card. I added the Popcorn Die Cut from the Sweet Summer Ephemera Pack. The Sunday word I cut from the Days of The Week Washi Tape and placed it onto white card to make it stand out a bit more. I printed out the middle wording and die cut it using a Label Die from the Memory Keeping Essentials Dies. The Fun & Love It are from the Noted Tab & Mood Stickers. To finish I added some White Enamel Dots from the Sweet Summer Enamel Dots Set.


Supplies;
Time For Tea Designs Paper Pad - Sweet Summer
Time For Tea Designs Dies - Memory Keeping Essentials
Time For Tea Designs Washi Tape - Days Of The Week
Time For Tea Designs Enamel Dots - Sweet Summer
Time For Tea Designs Stickers - Noted Tab & Mood
Time For Tea Designs Die Cuts - Sweet Summer Ephemera
Coloured Card
Patterned Paper


Don't forget you can use my discount code T4TKITTY10 at the Time For Tea Website to get 10% off your order.

Thank you for dropping by today, I will be back with more creations soon.

Kitty xx

Wednesday 3 November 2021

Warm Wishes

Morning crafy friends! Today I am sharing my final card that was made for my Penguins & Blending Backgrounds Project that was featured in Making Cards Magazine...

For this one I decided to create a slimline card. Again I used the MFT Holiday Penguins Stamp Set. I coloured each of the images with Copics and cut them out. I used my Mama Elephant Slim Woodland Die to create the tree frame and hills. I added a blended background behind my panel using Distress Oxide Inks in Mermaid Lagoon, Salvaged Patina & Cracked Pistachio. I then splattered the background with some ink and water. I added a touch of blue pen along the top of the snow hills and some glitter. I die cut the sentiment from blue and silver glitter card using the Mama Elephant Warm Wishes Die. To finish I added some clear gems.


Supplies;
My Favorite Things Stamps - Holiday Penguins
Mama Elephant Dies - Slim Woodland, Warm Wishes
Distress Oxide Inks - Mermaid Lagoon, Salvaged Patina, Cracked Pistachio
Copic Markers
Coloured & Glitter Card
Glitter
Clear Gems


Thank you ever so much for stopping by today and for all your comments/likes on my media channels. You guys rock!

Kitty xx

Tuesday 2 November 2021

Seasonal Snowmen

Good morning crafty friends. Today I am sharing my latest card that I whipped up. I had the images coloured up for ages so I'm glad I am finally getting around to using some of these ready images - it does make creating so much faster...

For this card I used the Avery Elle Snow Fun Stamps. I coloured in all the images with Copics and cut them out. I created the background by blending some Mermaid Lagoon & Tumbled Glass Distress Oxide Ink. I then splattered the background with some white paint and water. I used my Lawn Fawn Slimline Forest Border to create the trees and Lawn Fawn Stitched Hillsides to create the snow hills. I added a touch of glitter to the top of each hill. The sentiment is from Mama Elephant Everything Nice Stamp Set and die cut using the coordinating dies. I added a few clear bubbles to finish.


Supplies;
Avery Elle Stamps - Snow Fun
Mama Elephant Stamps - Everything Nice
Mama Elepahnt Dies - Everything Nice
Lawn Fawn Dies - Slimline Forest Border, Stitched Hillsides
Distress Oxide Inks - Mermaid Lagoon, Tumbled Glass
Copic Markers
Bubble Embellishments


That's all from me today, I hope you can join me again soon.

Kitty xx

Monday 1 November 2021

Very Merry Christmas

Good morning crafty friends! It's back to normal for us all here after having a week off school/work so it's all go here! Lots to do so I will keep this quick today. I thought I would share another of my cards from my making cards penguin project...

For this card I used the MFT Holiday Penguins Stamp Set. I coloured all the images with Copics and cut them out. I used the MFT Wishing You A Very Merry Christmas Stamp Set for the sentiment, I heat embossed it using Brutus Monroe Alablaster White Embossing Powder then did my blending over the top. I used Kitsch Flamingo, Spun Sugar & Shaded Lilac Distress Oxide Inks. I added some paint & water splatters and allowed to dry. To finish I added some Dew Drops.


Supplies;
My Favorite Things Stamps - Holiday Penguins, Wishing You A Very Merry Christmas
Distress Oxide Inks - Kitsch Flamingo, Spun Sugar, Shaded Lilac
Brutus Monroe Embossing Powder - Alablaster White
Copic Markers
Dew Drops


Thank you for popping by today, I will be back soon with more creations.

Kitty xx


Saturday 30 October 2021

Halloween Fun

I just thought I would share some fun makes I have made using some fab products from Doodlebug. I recently found a load of Doodlebug including some of the Halloween collections. We have a few of my daughters friends over for Halloween so I made this up as little favours/gifts to give them. I filled each ones with some cute Halloween themed sweeties & chocolates. I had so much fun creating these...

Everything I used is from Doodlebug Halloween Collections I think 2019 and 2020 but I could be wrong. I used the toppers from one of the 12x12 papers for the bag and mounted them onto silver glitter card. I used some papers for the tag topper and attached it onto a clear bag filled with choccy.

I used my Lawn Fawn Scallop Box Die and spotty card to create the box shape.I then decorated it with some Doodlebug Stickers and a die cut border. I added twine to the top and a mini peg.

For the lolly pop holder I used my Time For Tea Tag Shape Dies. I die cut two of them, folded each one on the bottom corners and fixed it together to create the flap. I punched a hole in the bottom so I could place the lolly through it and tied some ribbon onto it. I then decorated the lolly with papers and stickers.

That's all from me today, I hope you have a great Halloween tomorrow and I will be back with inspo next week.

Kitty xx

Thursday 28 October 2021

Sending You Love

Hello crafty friends and welcome to my latest post for Time For Tea Designs. This week I've created a fun box card. You probably know I love making these box cards and I haven't made one for a while so now was the time!


For this card I used the You've Got Mail Stamps & You've Got Mail Dies. I coloured in all the images with Copics Pens and added some highlights with a white pen. I created my box die with mint card and added some grass using the Landscape Edges Dies. I used the Scene It Stencil to create the sky along with some Salvaged Patina Distress Oxide Ink. I added the stamped & die sentiment to the front of the box with foam pads. I finished by adding some bubbles onto the back panel.


Supplies;
Time For Tea Stamps
Time For Tea Dies - You've Got Mail, Landscape Edges
Time For Tea Stencils - Scene It
Distress Oxide Ink - Salvaged Patina
Copic Markers
Coloured Card
Bubble Embellishments


Dont' forget you can use my discount code T4TKITTY10 to get 10% off your next order at Time For Tea Designs.

I will be back soon with more creations.

Kitty xx

Tuesday 26 October 2021

Bearing Gifts

Hello, it's time for my latest card for SugarPea Designs. I love the bear stamps as you may know so I couldn't resist making another one for Christmas. This one would also work for a winter birthday too...


I started off by creating my background. I blended a little blue ink onto my card base. I then splattered some white ink and water onto the panel and blotted with a paper towel. I cut two snow hills from white card, layered them together and added them onto the card adding some glitter too. I die cut a fence from kraft card using the Picket Fence Die. I also added a strip of washi tape. I used the Hey Winter Stamp Set for all my images. I coloured them all with copics and added them to the card with foam pads. I added some glitter to the bear hat too. I heat embossed the sentiment in white onto black card and added it with foam pads. To finish I added a few gems.


Supplies;
SugarPea Designs Stamps - Hey Winter
SugarPea Designs Dies - Picket Fence
Distress Oxide Inks - Mermaid Lagoon
Brutus Monroe Embossing Powder - Alablaster White
Copic Markers
Glitter
Washi Tape
Gems

Thank you for checking out my creation today and I will be back soon.

Kitty

Monday 25 October 2021

Holiday Penguins

Good morning! Today I thought I would share a sweet Penguin Christmas Card. This one is part of my three card project in Making Cards featuring ink blending so look out for the next two cards which I will add here soon. Here is the first one...


For this card I used MFT Holiday Penguins Stamp Set. I coloured all the images with Copic Pens and cut them out. I created the blended background using Distress Oxide Inks in Dried Marigold, Spun Sugar, Kitsch Flamingo and Seedless Preserves. I then splattered the backgrond with water and white ink. I used my Lawn Fawn Slimline Simple Hillside Borders Dies with some Glitter Card to create the snow hill. I stamped the sentiment onto white card and attached it with foam pads along with the images. To finish I added a few sequins.


Supplies;
My Favorite Things Stamps - Holiday Penguins
Lawn Fawn Dies - Slimline Simple Hillside Borders
Distress Oxide Inks - Dried Marigold, Spun Sugar, Kitsch Flamingo, Seedless Preserves
Copic Markers
Glitter Card
Sequins


Thank you for joining me today. I will be back soon with more creations.

Kitty xx

Thursday 21 October 2021

Cutie Driver

Hello! It's my turn today to share my latest card for Time For Tea Designs. I decided to make a cute scene with some different ink combos and of course some cute critters had to feature...

I always love using pink and green on cards and actually it does blend together quite nicely. I created the background first by blending Kitsch Flamingo, Spun Sugar and Twisted Citron Distress Oxide Inks. I splattered the background with some white ink and some water. I used the clouds dies from the Landscape Edge Dies to create the clouds which I cut from white card and vellum. I used the road die from the Slimline Hillside Scene Dies to create my road. I used the You Are Awesome Sentiment Dies to create my sentiment. I used the Car Critters Stamps & Dies (also sold separately) and coloured in the images. I popped them onto foam pads along with the sentiment and added them onto the card. To finish I added a few gems and sequins.


Supplies;
Time For Tea Designs Stamps - Car Critters
Time For Tea Designs Dies - Car Critters, You Are Awesome, Landscape Edges, Slimline Hillside Scene
Distress Oxide Inks - Kitsch Flamingo, Spun Sugar, Twisted Citron
Hero Arts Ink - Unicorn White
Coloured Card & Vellum
Gems & Sequins


Don't forget you can use my DT code which is T4TKITTY10 to get 10% off your next order at Time For Tea Designs.

Thank you for joining me today, I will be back soon with another creation.

Kitty xx

Wednesday 20 October 2021

Holly Jolly Bear

Good morning! Today I am sharing my latest card for SugarPea Designs. This one is actually made for the Challenge Inspiration for Mix It Up Challenge 84 and this months challenge features a sketch and colour combo. I mixed it up a little bit to create this fun winter card...

For this card I used the SugarPea Designs Hey Winter Stamp Set. I started off by creating a blended background using some grey and beige ink. I then added some splatters of brown, grey and white ink with a little water. I cut out some snow hills, added a little blue ink to the top and sprayed both pieces this shimmer spray. I then mounted the panel onto blue card and added it onto a card base. I stamped all my images and coloured them with Copics. I didn't have the matching dies for this set so I cut out each of the images and added them with foam pads. I stamped the sentiment from the same stamp set, layered it onto card and fixed in place. To finish I cut out a banner shape and added some gems onto it.

Head over to the SugarPea Designs Blog to find more inspiration and to enter our challenge - you could win a $50 gift certificate!


Supplies;
SugarPea Designs Stamps - Hey Winter
Distress Oxide Inks - Pumice Stone, Black Soot, Picket Fence,Tumbled Glass
Copic Marker Pens
Shimmer Spray
Coloured Card
Gems


Thank you so much for popping by today. I will be back with more creations soon.

Kitty xx

Thursday 14 October 2021

Snappy Before Coffee

Hi crafty peeps! It's time for my usual weekly inspo post for Time For Tea Designs. I used my favourite stamp set of the moment for this card and paired it with a bright blended background...

I started by creating my blended background. I used Kitsch Flamingo, Spiced Marmalade & Fossilized Amber Distress Oxide Inks. I used the Snappy Before Coffee Stamp Set for my images. I coloured them all with Copics and die cut them with the Snappy Before Coffee Dies. I added a strip of washi tape (which is a bit of sneaky peek - watch this space!) to the bottom background panel then added a frame which was die cut using the Smile Inverted Scallop Frame Dies. I stamped the sentiments onto black card and heat embossed them with Copics and again cut out with the dies.I assembled the white card together adding the frame, sentiments and crocs with foam pads.


Supplies;
Time For Tea Designs Stamps - Snappy Before Coffee
Time For Tea Designs Dies - Snappy Before Coffee, Smile Inverted Scallop Frames
Distress Oxide Inks - Kitsch Flamingo, Spiced Marmalade, Fossilized Amber
Copic Markers
Embossing Powder
Washi Tape
Coloured Card


Thank you for checking out my creation today. Don't forget you can get 10% off your order at Time For Tea Designs using the code T4TKITTY10. I will be back again soon with more cards.

Kitty xx


Wednesday 13 October 2021

Dino-mite Christmas

Good morning! I am back today with a fun Christmas card. I have had these cuties coloured ready on my desk for a few weeks now, so of course I had to get them on a card! Dinosaurs at Christmas? Why not...

For this card I used My Favorite Things Dino-mite Christmas Stamp Set. I coloured in each of the images with Copics and cut them out on my Scan & Cut. I created the blended background using Mermaid Lagoon Distress Ink. I added some splatters using the same ink and some white ink. I used the MFT Die-namics Merry Christmas Dies for the sentiment which I layered in black & white card. I used my Lawn Fawn Stitched Hillside Borders to create the snow hills. To finish I added a few Bubble Embellishments from Lucy's Cards.


Supplies;
MFT Stamps - Dino-mite Christmas
MFT Dies - Merry Christmas
Lawn Fawn Dies - Stitched Hillside Borders
Distress Oxide Ink - Mermaid Lagoon, Picket Fence
Copic Pens
Lucy's Cards - Bubbles


Thank you ever so much for checking out my card today. I will be back tomorrow with a bright fun card for my usual T4T DT weekly creation.

Kitty xx

Monday 11 October 2021

Yeti Winter Wishes

Hello crafty friends! Today I have a fun slimline card to share with you that I made using some of the new Clearly Besotted Stamps. I loved all the latest release but this set is just the cutest!! Who knew yeti's could be this cute...

For this card I used my Clearly Besotted Yuletide Yeti Stamp Set.I coloured all the images with Copics and cut them out. I created the blended background using Wilted Violet & Shaded Lilac Distress Inks. I then splattered the background with water and white ink. I created the snow hills using Time For Tea Slimline Hillside Scene Dies. I added a touch of copic along the top of each piece and sprayed it with glitter spray - so it is very sparkly but as usual it doesn't really show in photos. I added all my images with foam pads and used a sentiment from the Lawn Fawn Winter Wavy Sayings Stamp Set cut with the coordinating die. To finish I added some Lucy's Cards Bubbles.


Supplies;
Clearly Besotted Stamps - Yuletide Yeti
Lawn Fawn Stamps - Winter Wavy Sayings
Lawn Fawn Dies - Simple Wavy Banners
Time For Tea Designs - Slimline Hillside Scene
Distress Oxide Inks - Wilted Violet, Shaded Lilac
Copic Pens
Imagine Sheer Shimmer Spray
Lucy's Cards Bubbles


Thank you so much for stopping by today. I am truly grateful for each and every one of you that helps me to keep going each day. Have a lovely Monday and I will be back soon with more creations.

Kitty xx

Friday 8 October 2021

You Are Truly Appreciated

Good morning. With the cooler weather hitting us I've been spending more time in my craft room - it's much warmer in there! This does mean I have had a bit more to create some fun cards. I have had a load of ready coloured images on my desk waiting to be made into cards. I couldn't wait to use these fun stamps from Clearly Besotted, they remind me of the pig family in the movie Sing...

For this card I used Clearly Besotted Cleaning Up Clear Stamp Set. I coloured each of the image with Copics and cut them out. I created a subtle background using my MFT English Brick Wall Stencil and a little grey ink. I masked off the bottom piece and blended that area using the same grey ink. I used a Simon Says Stamp Thanks On A Line Die to create the sentiment at the top. I stamped the other sentiment (from the same stamp set) directly onto the card. I then added all the images onto the card with foam pads and added some clear bubbles to finish.


Supplies;
Clearly Besotted Stamps - Cleaning Up
Simon Says Stamp - Thanks On A Line
My Favourite Things Stencils - English Brick Wall
Copic Markers
Lucy's Little Things - Bubbles
Coloured Card


Thank you for visiting me today. I will be back with more creations soon.

Kitty xx

Thursday 7 October 2021

Really Really Love You

Hello crafty peeps. It's Thursday and time for my usual weekly post for Time For Tea Designs. I went with a sweet clean and simple card using some cute critters...

For this card I started out by blending some Kitsch Flamingo & Spun Sugar Distress Oxide Inks. I then die cut a the small frame from the Time For Tea Smile Inverted Scallop Frames Die Set from white card and glued it directly onto the card. I used stamped the cute critters and accessories from the Time For Tea Designs Smitten Kittens Stamp Set. I coloured them with copic markers and cut them out as I didn't have the coordinating dies for this set. I arranged them on the card and fixed them with foam pads. I used the Brighter Days Sentiment Cards for the sentiment and simply cut it onto three pieces. To finish I added a few clear gems.


Supplies;
Time For Tea Designs Stamps - Smitten Kittens
Time For Tea Designs Dies - Smile Inverted Scallop Frames
Time For Tea Designs Sentiment Cards - Brighter Days Grey
Distress Oxide Inks - Kitsch Flamingo, Spun Sugar
Copic Markers
Clear Gems


Dont' forget to use my code T4TKITTY10 to get 10% off your order at Time For Tea Designs.


Thank you for visiting today and all your likes/comments on my media spots - you guys rock!

Kitty xx

Tuesday 5 October 2021

Ghostly Greetings

Good morning crafty friends. It's sure getting chillier here now which reminds me I need to get on with some festive cards with all the fab holiday's we have coming up. Today I created a fun Halloween Slimline card with some cute critters...

For this card I used the new Reverse Confetti Boo Day Stamps. I coloured them with Copics and cut them out. I created the background by blending some Wilted Violet & Shaded Lilac Distress Oxide Ink across the whole panel. I then used my MFT Cloud Stencil to add some subtle clouds using the same ink. I blended some Black Soot Distress Oxide Ink around the edges. I splattered the background with some water, white ink and black ink. I used my Reverse Confetti Layered Boo Die to create the main sentiment which I die cut from black glitter and white card. I heat embossed the smaller sentiment in white onto black card. I assembled everything onto my card with foam pads.


Supplies;
Reverse Confetti Stamps - Boo Day
Reverse Confetti Dies - Layered Boo
My Favorite Things Stencils - Cloud Edges
Distress Oxide Inks - Wilted Violet, Shaded Lilac, Black Soot, Picket Fence
Brutus Monroe Embossing Powder - Alablaster White
Copic Markers


Thank you ever so much for stopping by my little blog today. I will be back with more creations very soon.

Kitty xx

Thursday 30 September 2021

A Howling Good Day

Afternoon! It's time for my weekly Time For Tea Designs card. I decided to use the new Dog Gone Mutts Stamp Set as the doggies in it are just so cute! I went for a strong bright colour background...


I used the Time For Tea Design Dog Gone Mutts Stamps and coloured them in with my Copics. I then die cut the image with the coordinating Dog Gone Mutts Dies. I created the backrgound by blending Chipped Sapphire, Blueprint Sketch & Mermaid Lagoon Distress Oxide Inks. I then blended Mowed Lawn & Twisted Citron onto a strip of card and die cut it using the grass die from the Landscape Edge Dies. I die cut the panel using the Square Label Frame Dies and attached it onto kraft card. I used the fence, clouds and hedges from the Windmill Add On Dies. I blended some ink onto the hedges before adding them. I stamped the sentiment onto black card and heat embossed it in white then die cut it. I fixed everything onto the card with foam pads and added some gems to finish.


Supplies;
Time For Tea Designs Stamps - Dog Gone Mutts
Time For Tea Designs Dies - Dog Gone Mutts, Square Labels, Windmill Add On, Landscape Edge
Distress Oxide Inks - Chipped Sapphire, Blueprint Sketch, Mermaid Lagoon, Mowed Lawn, Twisted Citron
Brutus Monroe Embossing Powder - Alablaster White
Copic Markers
Coloured Card
Clear Gems

Dont' forget you can use my discount code T4TKITTY10 to get 10% off your order on the Time For Tea Designs website.


Thank you as always for stopping by and for all your likes/comments on my social media pages. I will be back soon with another creation.

Kitty xx

Tree Picking

Good morning! I have two cards to share today, one now and one this afternoon. I really need to get a wriggle on and make some more Christmas cards before I run out of time - it always suddenly creeps up on us. I am loving all the new releases from my favourite brands so it does make it more fun and easier when you have ace products to use. I went with some of the new releases from Mama Elephant...

For this card I used Mama Elephant Tree Picking Stamp Set. I coloured all the images with Copic Markers and cut them out. I created a blended background using Abandoned Coral, Worn Lipstick & Tattered Rose Distress Oxide Inks. I don't think I've used this combo before but I think it's quite nice and a bit different. I die cut white card using just the snow hill parts of the Mama Elephant Slim Woodland Die. I added a little blue ink onto the top of each hill. I splatted my background with glimmer spray, white paint and I added some dots with my White Posca Pen.I assembled the card together, adding the critters with foam pads and mounted onto glitter card. To finish I added a stamped and mounted sentiment.


Supplies;
Mama Elephant Stamps - Tree Picking
Mama Elephant Dies - Slim Woodland
Distress Oxide Inks - Abandoned Coral, Worn Lipstick, Tattered Rose, Tumbled Glass
Copic Markers
Posca Pen


Thank you so much for visiting my blog today. I will be back later on with my latest T4T card.

Kitty xx

Wednesday 29 September 2021

Meant To Be

Good morning! Today I am over on the SugarPea Designs Blog with a card for the latest challenge Mix It Up 83. We have a sketch & colour combo for this challenge so you can choose either one or both! I used a bit of both...

For this card I used the Hey Honey Stamp Set for the bear, bees and sentiment. To start I used the Wave Stencil to create the subtle background using a little light grey ink. I stamped the bear onto kraft card and used the Hey Honey Sugar Cuts to die cut him out. I also added a little ink around the edges of him. I stamped the bees, die cut them and added them onto the card with foam pads. I stamped the senitment onto white card then die cut it using the Stacked Honeycombs SugarCuts. I added a strip of washi tape and some dew drops to finish.


Supplies;
SugarPea Designs Stamps - Hey Honey
SugarPea Designs Dies - Hey Honey, Stacked Honeycombs
SugarPea Designs Stencils - Wave
Distress Oxide Inks - Pumice Stone
Cathrine Pooler Inks - Tiara
Washi Tape
Dew Drops


Don't forget the challenge ends on 30th September so get your entry in soon to be in with a chance of winning a $50 voucher.


I will be back tomorrow with my latest card for Time For Tea Designs.

Kitty xx

Tuesday 28 September 2021

Back To School

Hi crafty peeps! Today I am sharing my final card from my Back To School project using Mama Elephant Stamps. I had such fun making these cards as in the UK we don't really send back to school cards so it was a nice welcome change...

For this card I used Mama Elephant School Rules & Bookworm Stamp Sets. I coloured in each of the images with Copics and cut them out. I created the background by gently blending Tea Dye & Gathered Twigs Distress Oxide Inks all over the panel masking off a piece at the bottom. I then used my MFT English Brick Wall Stencil and brushed the ink all over, pressing slightly heavier. I then added some Pumice Stone Distress Oxide Ink onto the bottom panel. I used the MFT Pop Up Banner Dies to create the bunting at the top. I added all my pieces with foam pads and added a stamped, mounted sentiment.


Supplies;
Mama Elephant Stamps - School Rules, Bookworm
My Favorite Things Dies - Pop Up Banner
My Favorite Things Stencils - English Brick Wall
Distress Oxide Inks - Tea Dye, Gathered Twigs, Pumice Stone
Copic Markers
Coloured Card


Thanks so much for stopping by today. I will be back tomorrow with a card I've created for SugarPea Designs. Have a lovely rest of the day!

Kitty xx

Saturday 25 September 2021

STAMPtember Everyday Home

Hello crafty peeps! Very exciting news today... SugarPea Designs have teamed up with Simon Says Stamp for STAMPtember. This means there is a exclusive collab stamp set which is now available over at Simon Says Stamp. This set is called Everyday Home and is simply stunning. Scroll below for my card.


For this card I used the Simon Says Stamp Everyday Home Stamp Set. I coloured each of the images with Copic Pens and cut them out. I created the wall background using SugarPea Designs English Bond Brick Wall Stencil with Bundle Sage Distress Oxide Ink. I then masked off a little area at the bottom and blended a little Pumice Stone Distress Oxide Ink. I stamped & layered the sentiment onto card. I arranged each of the images onto the card and fixed them in place with foam pads.


Supplies;
Simon Says Stamp Staps - Everyday Home
SugarPea Designs Stencils - English Bond Brick Wall
Distress Oxide Inks - Bundled Sage, Pumice Stone
Copic Pens
Coloured Card


Thank you ever so much for visiting me today and for all your likes/comments over on my social channels. I will be back next week with some more of my latest creations.

Kitty xx

ShareThis

LinkWithin

Related Posts with Thumbnails