Showing posts with label Anything But A Card. Show all posts

Wednesday, 24 November 2021

Doodlebug Shadow Boxes

Hi crafty peeps! Today I thought I would share some sweet boxes that I made using Doodlebug Designs Collections that were featured in Crafts Beautiful. These are actually little shadow boxes that you can use as Christmas tree decorations or just little hanging decs. I love how cute all Doodlebug products are...

For these boxes I created a box template to create the boxes that measured 8cm square. I then die cut a window in the front of each box using Time For Tea Designs Square Label Dies, Circle Dies and MFT Square Dies. I used Doodlebug Santa Claus Is Coming To Town Petite Prints Papers and coordinating card to create the box, outer and inner panels. I punched a hole in the top and added a ribbon handle. I added glitter card inside each panel to create a snow effect. I decorated the inside and outside of the boxes with Doodlebug Icon Stickers & Mini Stickers.


Supplies;
Doodlebug Santa Claus Is Coming Town Collection - Icon Stickers, Mini Stickers, Petite Prints Papers
Time For Tea Designs Dies - Circles, Square Labels
MFT Die-namics Dies - Square STAX
Coloured Card


Thank you ever so much for stopping by today. I will be back tomorrow with my latest card for Time For Tea Designs.

Kitty xx

Thursday, 11 November 2021

My Summer Memory Book

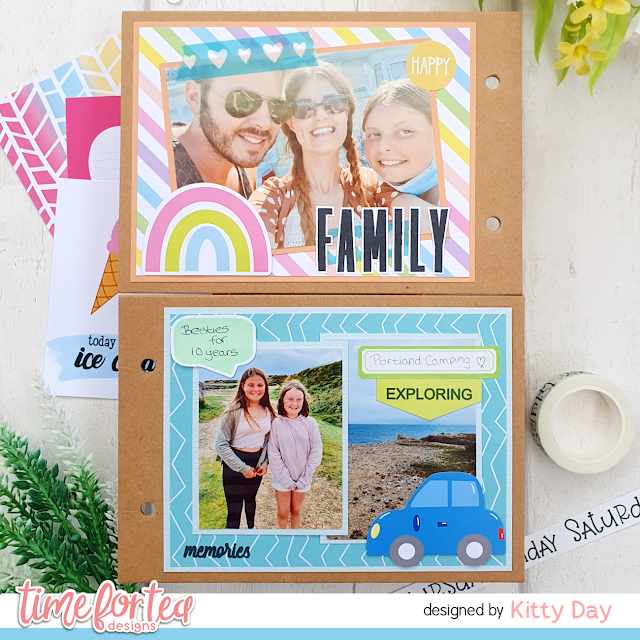
Hello & welcome to my usual Thursday post for Time For Tea Designs. Today I am sharing my summer memory book that I made using lots of the new products from the Memory Keeping Collection. I was going to share just a page of my book, but I thought I would just share the whole thing so there are quite a few pictures! I had so much fun creating this one...

I used a book chipboard book as my base layer for my book and creating each page directly onto each piece. I used papers from both the Sweet Summer Paper Pad and Brighter Days Paper Pad. I used quite a big mix of the embellishments! I used the Sweet Summer Journaling Cards, Sweet Summer Die Cut Ephemera, Enamel Dots, Washi Tapes, Noted Tab & Mood Stickers, Label & Banner Stickers. I used the new Tall Alpha Stamp Set to spell out the word 'Family'. I used the 'Memories' word & 'Location Symbol' from the Creating Memories Stamp Set. I used the Memory Keeping Essential Dies to create the 'Lol' word & heart shapes. You can view all the products from the latest collection here.


I do hope you have enjoyed viewing my book. Don't forget you can get 10% off your next order using the code T4TKITTY10.

Kitty xx

Thursday, 4 November 2021

Sunday Fun

Hello crafty friends and welcome to my usual weekly post for Time For Tea Designs. Last week the new memory keeping release went live so I thought I would share my latest make using some of the new items. It was such a refreshing change to create some memory book/journaling pages and books and I can't wait to share more with you. Here is my first page...


I started out by creating my background. I used lots of different cardstockk to create a bright backing along with a touch of patterned paper. The yellow & blue panels are from the Sweet Summer Paper Pad which were mounted onto white card. I mounted all three photos onto glitter card. I added the Popcorn Die Cut from the Sweet Summer Ephemera Pack. The Sunday word I cut from the Days of The Week Washi Tape and placed it onto white card to make it stand out a bit more. I printed out the middle wording and die cut it using a Label Die from the Memory Keeping Essentials Dies. The Fun & Love It are from the Noted Tab & Mood Stickers. To finish I added some White Enamel Dots from the Sweet Summer Enamel Dots Set.


Supplies;
Time For Tea Designs Paper Pad - Sweet Summer
Time For Tea Designs Dies - Memory Keeping Essentials
Time For Tea Designs Washi Tape - Days Of The Week
Time For Tea Designs Enamel Dots - Sweet Summer
Time For Tea Designs Stickers - Noted Tab & Mood
Time For Tea Designs Die Cuts - Sweet Summer Ephemera
Coloured Card
Patterned Paper


Don't forget you can use my discount code T4TKITTY10 at the Time For Tea Website to get 10% off your order.

Thank you for dropping by today, I will be back with more creations soon.

Kitty xx

Saturday, 30 October 2021

Halloween Fun

I just thought I would share some fun makes I have made using some fab products from Doodlebug. I recently found a load of Doodlebug including some of the Halloween collections. We have a few of my daughters friends over for Halloween so I made this up as little favours/gifts to give them. I filled each ones with some cute Halloween themed sweeties & chocolates. I had so much fun creating these...

Everything I used is from Doodlebug Halloween Collections I think 2019 and 2020 but I could be wrong. I used the toppers from one of the 12x12 papers for the bag and mounted them onto silver glitter card. I used some papers for the tag topper and attached it onto a clear bag filled with choccy.

I used my Lawn Fawn Scallop Box Die and spotty card to create the box shape.I then decorated it with some Doodlebug Stickers and a die cut border. I added twine to the top and a mini peg.

For the lolly pop holder I used my Time For Tea Tag Shape Dies. I die cut two of them, folded each one on the bottom corners and fixed it together to create the flap. I punched a hole in the bottom so I could place the lolly through it and tied some ribbon onto it. I then decorated the lolly with papers and stickers.

That's all from me today, I hope you have a great Halloween tomorrow and I will be back with inspo next week.

Kitty xx

Friday, 17 September 2021

You Can Read Me Like A Book

Hello! It's Day 5 of the Sweet Peeks at SugarPea Designs. We have a few more products to share with you and the release goes live today at 2pm EST and 7pm BST. Which have been your favourite must have products? Today we are previewing the books stamps & dies collection. I created a simple bookmark using mostly just dies...


I started by using the Basic Bookmark Die Set to create my background which I cut from kraft card. I die cut the books from white, kraft and various rainbow colours and assembled them together. I die cut the Book word using the Books Word With Shelf Die and assembled it together. I added a strip of lighter kraft card at the bottom then added the books with foam pads. I added the die cut sentiment then added a stamped sentiment from the Book Stamp Set. I finished by added some gems and some ribbon.


Supplies;
SugarPea Designs Dies - Basic Bookmark, Book Words with Shelf
SugarPea Designs Stamps - Book Club
Coloured Card
Gems
Ribbon


Do make sure you visit the main SugarPea Blog and each of the DT Blogs to get an extra entry in the prize draw to win a $50 gift voucher, today is the final time you can get your extra entry.

Amy Kolling
Francesca Vignoli
Jennifer Timko
Tatiana Trafimovich
Tricia Barber
Vera Yates


I really want to thank each and everyone of you that has stopped by my blog this week. I am loving being on the SugarPea team. I will back next week with more creations! Have a great weekend.

Kitty xx

Friday, 18 October 2019

Christmas Hoops

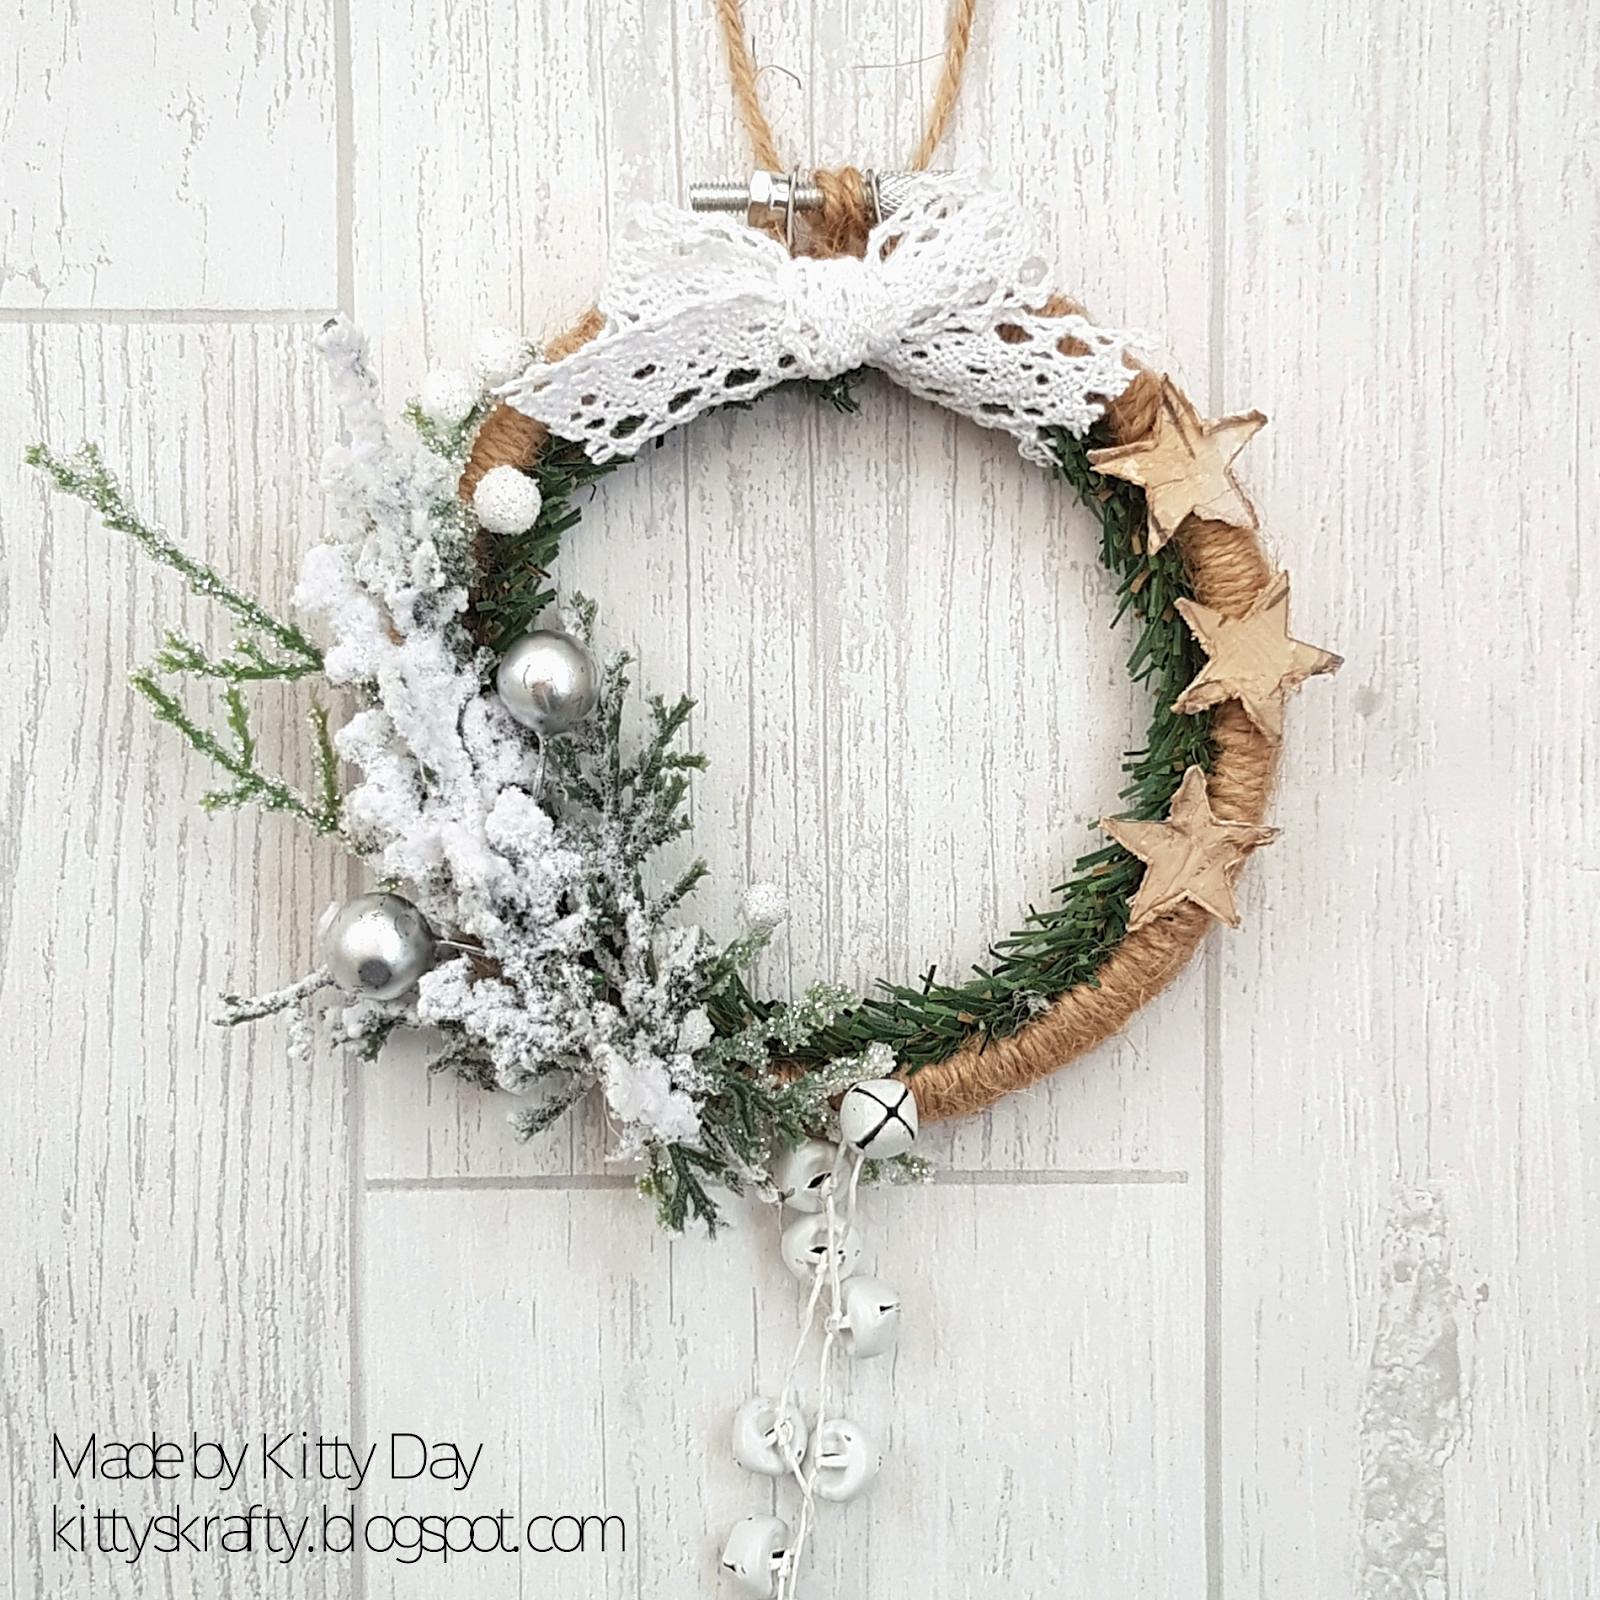
Christmas seems to be creeping up on us fast. I've already spotted so many Christmas items in the shops. Luckily for me, I love Christmas! I love creating Christmas cards and decorations so it's definitely my favourite time of year. I'm sharing today a couple of decorative wreaths that I made...
I used some wooden embroidery hoops to create the shape. I then wrapped twine all around each one. I used a mixture of items from Ross Paper, Anna Marie Designs, The Range and The Works. I wrapped wreath borders around the inside of the hoop. I decorated the edges with snow topped branches, glitter stems and Berries. I added some wooden stars, a bow and some string mini bells. I had so much fun creating these, I will be definitely making some more wreaths.

Supplies;
Wooden Embroidery Hoops
Wreath Border Strips
Snow Topped Branches
Glitter Stems
White Mini Bell Strings
Distressed Wooden Stars
Berries
Twine
Ribbon and Lace

More creations from me coming this way soon.
Kitty xx

Tuesday, 18 September 2018

Christmas Star Plaque

Hi all :)
I had a great time at Ally Pally Craft Show over the weekend. It was lovely to go back to that show, I've not been for 6 or 7 years! I had a good time shopping for new bits and as always I ended up spending loads on Anna Marie Designs! I got lots of lovely MFT bits from there and a few other places. I had a play yesterday and came up with this xmas plaque...
For this I used a MFT Star and covered it with patterned paper. I added distress ink to the edges and added some glass glitter. I also added some leaves, tree pieces, flowers, pine cones, berries and extra embellishments. I also used a Stag Head and Wooden Sentiments.

I will be back soon :)
Kitty xx

Tuesday, 25 September 2012

Halloween Lollipop Treat Bags

Today i have something a bit different to show you... some cute lil halloween lollipop treat bags!!
Apologies for the poor photo it's rubbish weather here so i can't get a very clear piccy!
I made these using the faberoonie Dienamics Lollipop Treats Die & Stamp Set along with some Echo Park Chillingsworth Manor Papers! I haven't actually got any lollipops in these little holders yet but i will do soon!! I am planning on making a ton of cute halloween treats as it's my daughters 7th birthday and we are having a halloween themed birthday party for her - i have my work cut out so watch this space for lots more lil ideas, bags & boxes.

Come back tomorrow for my latest card :)
Kitty xx

Friday, 8 July 2011

Card Makin Mama's - Summertime

It's Friday and time for a new challenge at Card Makin Mama's
This week we have a lovely summery theme..er....
Summertime
So we want to see lots of summery, bright funky cards!
This week we are sponsored by the fabby Some Odd Girl and they are giving the lucky winner 3 Digi's!!!! So get creating and you could be in with a chance of winning!
Now i have been a bit naughty this week and not done a card and seeing as this is a Cardmaking Challenge...please feel free to give me a slap on the bum!
I have however made a summery frame so rather than show you nothing, i can show you this :)
This frame is made using a wooden frame from My Mums Craft Shop. I painted it with Decopatch Gesso and then used Decopatch Papers & Glue to cover the frame edges. I then coloured La La Land Marci With Flower Stamp with my copics and added Flowers & a Die Cut Swirl.

If you haven't already, head over to the CMM Blog and check out the rest of the DT's fab inspiration!

Supplies - La La Land Stamps, Decopatch Papers, Decopatch Glue, Gesso Paint, Cherry Blossom Flowers, Copics & Magnolia Swirl Die

Thursday, 18 November 2010

My Christmas Gift Ideas 1

Hello everyone, i am here and no i haven't fallen off the planet lol! I have been very busy with lots of DT work that i will get to show you very very soon!! Over the next few weeks i will be showing you lots of Christmas Gift Ideas! I have a few craft fairs coming up so i have been very busy plus i have decided i am making all the presents this year!
Here are my little Christmas Tree Boxes, now i haven't decided what i will be putting in them but the possibilities are endless, as they say!

I thought these would look a bit nicer with only a few details so they have that less is more look!
Well i am very please i finally am using up some of my Doodlebug Stickers, as it turns out these trees are just the right size! I of course used the fantastic but hard to find Sizzix Carry All Box XL die, i am so pleased i got this die, its fabby and i can't wait to make up a few more little boxes!

Supplies - Sizzix Bigz XL Carry All Box Die, Bazzill Cardstock, Doodlebug Stickers, Mini Messages, Jewels & Doodlebug Ribbon.

Sunday, 7 November 2010

Pamper Box

I have managed to catch up with some DT work this weekend which you will be seeing very soon!! I also managed to make a few other bits and pieces! Today i have a lovely Pamper Box to share with you! I will be posting a tutorial on this very soon too so check back for that!

This was very simple to make and i think it makes a lovely gift! I have filled mine with mini bath bombs but i am planning to do a few more of these, you could put a flannel & soaps or anything really!!
I used a load of SU Cardstock as it is pretty sturdy compared to anything else i have! I then decorated it with some lovely Basic Grey Papers that i picked up at Ally Pally half price!! They are soooo pretty too!! I used a fabby Pure Innocence stamp by My Favorite Things, so cute and ideal for my pamper box!

I also used my new Cuttlebug Quilling Dies to make my flower... love love love this soooo much and it only takes maybe 2-3 mins to do but only really ideal for boxes, bags etc as they are very bulky and 3D!
Supplies - MFT Pure Innocence Stamp, Basic Grey Papers, SU Cardstock, Nestabilities, Martha Stewart Punch, Cuttlebug Quilling Dies, Jewels, Copics, Glamour Dust & Marianne Swirl.

Thursday, 4 November 2010

Hot Chocolate Gift Set

I am here, lol! I have had a very busy few weeks so sorry for not updating my blog much! I have been making a few things here and there but unfortunately by the time i get it is pitch black dark so i can't seem to get any decent photos so these will have to do for now!

I have been busy busy preparing for two craft shows i am doing and also making lots of Christmas presents! Here is a little Hot Chocolate Set i put together!
It is a mug containing 2 sachets of Hot Chocolate, a pack of marsh mellows, a candy cane & a chocolate square, pretty cute i think!
I used some lovely Basic Grey papers i have had sat around for ages so i thought i would put them to good use and make a coordinating set! I used my SU Punches for the scallop & circles and my old faithful snap stamps!
I wrapped it up in some clear cellophane and added some ribbon and ta-da, all finished!

Supplies - Basic Grey Papers, Stampin Up Punches, Snap Stamps & Ribbon

Monday, 25 October 2010

Cards For Men Challenge 22

I know i keep saying this but where does the time go!?! Only seems like yesterday i was posting my last challenge card! Anyway on with the challenge...
This week's challenge at Cards For Men is an easy peasy one! Yup its time for 'Anything Goes'.. well as long as it's male that is!! This fortnight we are sponsored by the fabby Digital Delights, they were so lovely to supply us all with images but unfortunately i didn't get the chance to use any of mine (life, work & exhaustion has a real habit of getting in the way at the moment!! grrr!) but make sure you go check out the rest of the Design Teams examples!
Here is mine.. not a card but a lovely treat box!

Sorry about the poor photos i will try and take better ones sometime this week! This was super easy to make once i figured out the dimensions and sizes of paper etc! I am planning to make a few of these for a couple of craft shows i am hoping to have a stand at soon!! Hopefully i will get to show you more of these kinda creations this week!

I used my lovely new Echo Park Papers, they are lovely and have such fabby traditional colours which makes a change for me as i am usually all about the contemporary! I also teamed this up with my lovely new swirl die and of course a lovely LOTV image! I filled my treat box as you can see with loads of scrummy choccies, i have to say it was a job keeping Lissy away from these!!!

I would also like to enter this into the following challenges....

Totally Gorjuss - Sparkle

The Crafty Pad - Christmas

Crafty Sentiments - Anything But A Card

Sweet Stampin Challenge - Anything But A Card

Supplies - Lili Of The Valley Image, Echo Park Papers, Marianne Swirl Die, Bazzill Cardstock, SU Ribbon & Glamour Dust

Sunday, 24 October 2010

Crimbo Treat Bag

All this working malarky has definitely killed my crafting mojo, time & energy!!
I have managed to make a few bits and pieces this weekend which i will show you over the next couple of days, i need to get a wriggle on as i need to be creating lots of bits for craft fairs, presents and of course blooming Christmas which is looming closer!!
Lissy wanted to help me create last night so we made a cute little gift box with ribbon round the handles! Inside as you can see are matching cute little covered chocolate coins! She chose the images bless her probably because she thinks it looks like her! They are perfect little gifts to make for her school buddies this christmas and sooooo quick, easy and cheap!

I am pleased i am finally using some of these images that Lissy begged me to get, i did wonder when they would get used! I am in serious desperate need of new Copics as all my usual colours seem to have run out so it's definitely the time to use images & die cuts!

Supplies - Kanban Images, SU Punches, SU Cardstock & Ribbon

Saturday, 31 July 2010

My Sketch Notebook

I am forever always noting down sketch & layout ideas for my cards so what better way to keep them all together than to make a cute little notebook! I only have the big rings that came with my Cinch but then this leaves me with the option to add more papers to it! :)
I used one of my fav Penny Black images! I also used one of my fab new Nellie Snellen dies along with the freebie papers from CMPC Magazine. I am so loving MME papers at the mo as you might have guessed by now, lol!

I would like to enter this card into the following challenges....
.
Penny Black Saturday Challenge - Receipe
Paper Play Challenges - Anything Goes

Wednesday, 21 July 2010

Twilight Easel Box & Book Corner

Sorry i haven't been around for a few days. I have been working on several new projects i can't show you yet, hehe!! I keep seeing these Easel Boxes around on blogs so i decided to have a go & create one! I have just been watching the Twilight films, yes i know years late lol and i love them & am now obsessed! So with this in mind i thought i would create a Twilight inspired Easel Box.

I am going to give this little beauty to my friend's daughter Beth as she absolutely loves Twilight! As you can see i have also made a little Book Corner too! It is the perfect size to fit in the Easel Box drawer too and as i know Beth constantly reads the Twilight books over & over again i thought this would be perfect!!

Seeing as i have never made either of these before i am quite pleased how it turned out! If you want to make your own version this is Beate's Corner Bookmark Tutorial and here is Tammy's Desk Top Calender Tutorial - i just edited out the calender bit as i thought July would be a bit late for that!!

Supplies - Pixie Dust Studio Twilight Digi Stamps, Basic Grey Papers, Copics, Flowers (wild rose studios), Martha Stewart Punch, Scor-pal, Penny Black Wording Stamp & Doodlebug Jewels

Monday, 19 July 2010

Elzybells Storage

Well now that soon we won't be able to buy any more Elzybells Stamps, i thought i would make something nice for them to go into! I was originally thinking a binder of some sort but then i came across a fab treats box by Maria and thought this was ideal for my unmounted ones!

You can put anything in these little holders and they are super easy to make! I think i shall be making a few more of these for my other stamps n things!
Here is my new Elzy box stuffed full of Stamps ready to go on my new craft shelves that i haven't got yet!!
I know its an old Doodlebug paper but i am trying to use up a load of old papers so i can get some brand spankin new ones!! I shall try retake the piccies in the morning as there is not much light here now!
i couldn't find any challenges to enter this into so if anyone knows of any please leave me a comment! :D
.
Supplies - Elzybells Stamp, Doodlebug Paper, Copics & Promarkers, Martha Stewart Punches, Jewels & Ribbon (American Crafts, it think!)

Thursday, 24 June 2010

Quick Bits n Bobs!

Here is some quick things i put together for the craft stall i mentioned in my previous post!! It was a bit of a last minute thing so i only had a couple of days to get anything ready!! My pet hate is being rushed too!! GGRRRRR! lol
Little Notepads: These are made using the cute die cut decoupage by Paper Mania and matching papers. Added some cute green jewels to match and of course scallop punches!!
More Slightly Bigger Notepads: I used the new range by Papermania for these. I used the clear stickers and put them onto white cardstock and mounted them onto matching paper that i used to cover the front of the notepads.

Post It Note Holders: The top two are made with DCWV Papers & Chipboard and the bottom two are made with K&Co matching papers and embellishments.

Sweetie Jars: Mini Jars filled with Mini Imperials with matching papers & chipboards by DCWV, from an old TSV.

Decorated Homemade Lemon Curd Jars: These lovely summery papers are also from the DCWV set i have had for some time! I am eventually getting round to using them!

Kitty xxx

ShareThis

LinkWithin

Related Posts with Thumbnails